


Available Now
How to Treat Mould on Exterior Walls Before Painting?
Leo Donovan • Oct 16, 2023

To treat mold on exterior walls before painting: clean, make a bleach solution, apply, scrub, rinse. Prevent mold with better drainage, trimming plants, and mold-resistant paint. Don't just paint over it; that won't work! Mold forms due to moisture, lack of sunlight, poor ventilation, and organic matter.
Safety precautions, including protective gear and ventilation, are crucial.
Necessary tools: safety gear, cleaning solution, brushes, pressure washer, ladder.
The process involves preparation, homemade mold remover, application, scrubbing, and rinsing.
Preventing mold: address drainage, trim foliage, consider mold-resistant paint.
When it comes to painting the exterior of your home, you might be eager to transform its appearance. However, there's a formidable enemy that can stand in the way of your home improvement dreams: mold. Mold on exterior walls is not only unsightly but can also jeopardize the integrity of your paint job. In this comprehensive guide, we'll explore the importance of treating mold on exterior walls before painting, understand the root causes of mold formation, and take you through a step-by-step process to effectively combat it.
Introduction
Painting your home's exterior is a fantastic way to enhance its curb appeal, protect it from the elements, and increase its value. But before you pick up that paintbrush, it's crucial to address any mold issues lurking on your exterior walls.
Mold, often appearing as unsightly patches of green, black, or brown, can be more than just a cosmetic concern. It can compromise the durability of your paint, the structural integrity of your walls, and even pose health risks to you and your family.
Therefore, taking the time to treat mold properly before painting is essential. For those who are considering a professional touch for their exterior painting project,
Perfect Painters in Ballarat are experts in the field.
Understanding the Problem

Why Does Mold Form on Exterior Walls?
Mold is a resilient and pervasive organism that can thrive in various environments, including your home's exterior walls. Several factors contribute to mold formation on these surfaces:
· Moisture: Moisture is the primary catalyst for mold growth. When exterior walls are exposed to rain, humidity, or inadequate drainage, they become a breeding ground for mold.
· Lack of Sunlight: Areas with limited exposure to sunlight are more prone to mold growth. This is because sunlight helps to inhibit mold development.
· Poor Ventilation: Inadequate ventilation can trap moisture against the walls, creating an ideal environment for mold to flourish.
· Organic Matter: Mold feeds on organic materials such as dirt, dust, and even the paint itself. These substances can accumulate on your exterior walls over time.
· Leaky Gutters or Downspouts: Water overflowing from gutters or downspouts can saturate the walls, creating the perfect conditions for mold to thrive.
Now that we understand why mold forms, let's move on to how to safely and effectively remove it before painting.
Safety Precautions
| Tools and Materials | |
|---|---|
| Tools and Materials | Purpose |
| Brushes or Pads | Mold scrubbing |
| Pressure Washer | High-pressure rinsing |
| Ladder | Access to higher areas |
| Cleaning Solution | Mold removal solution |
| Safety Gear | Personal protection |
Before we dive into the mold removal process, safety should be your top priority. Mold spores can be harmful when inhaled or come into contact with your skin. Here are some essential safety precautions to take:
· Protective Gear: Wear gloves, a mask, and safety goggles to shield yourself from mold spores and cleaning chemicals. If you're unsure about the extent of sanding required before painting exterior wood, this guide can provide clarity.
· Ventilation: Ensure proper ventilation in the area where you're working to minimize inhalation of fumes.
· Isolation: Isolate the work area from the rest of your home by sealing off doors and windows to prevent mold spores from spreading.
· Notify Others: Inform family members or neighbors about your project, especially if you share walls with them. This way, they can take precautions as well.
Tools and Materials
Now that we've covered safety measures, let's gather the tools and materials you'll need for the mold removal process:
· Safety Gear (as mentioned above): Gloves, mask, safety goggles.
· Cleaning Solution: You'll need a cleaning solution made of bleach and water. The recommended ratio is one part bleach to four parts water.
· Scrubbing Brushes or Pads: Stiff-bristle brushes or scouring pads will help you remove surface mold.
· Pressure Washer: A pressure washer will come in handy for tackling stubborn mold and dirt on the walls.
· Ladder and Safety Equipment: If your mold problem extends to higher areas, ensure you have a secure ladder and necessary safety equipment.
Now that we're prepared, let's move on to the step-by-step process of treating mold on exterior walls before painting.
Step 1: Preparation

Cleaning the Affected Area
The first step in your battle against mold is to prepare the affected area. Before you can tackle the mold, clear away any debris, peeling paint, or loose materials from the walls. This will ensure a clean surface for mold removal. If you're considering a fresh coat for your exterior walls,
Perfect Painters in Ballarat offers top-notch services to meet your needs.
· Inspect Your Walls: Carefully examine your exterior walls, paying close attention to areas that are shaded or exposed to moisture, such as near gutters and downspouts.
· Remove Debris: Before you can tackle the mold, clear away any debris, peeling paint, or loose materials from the walls. This will ensure a clean surface for mold removal.
Step 2: Homemade Mold Remover
Creating the Mold Removal Solution
Now that your walls are prepared, it's time to create a homemade mold removal solution. If you're looking for more detailed steps on prepping for exterior painting,
this article provides valuable insights.
· Safety First: Put on your safety gear—gloves, mask, and safety goggles—to protect yourself from the cleaning solution and mold spores.
· Mix the Solution: In a bucket, combine one part bleach with four parts water. This mixture is your primary weapon against mold.
Step 3: Applying the Solution
Safely Applying the Bleach Solution
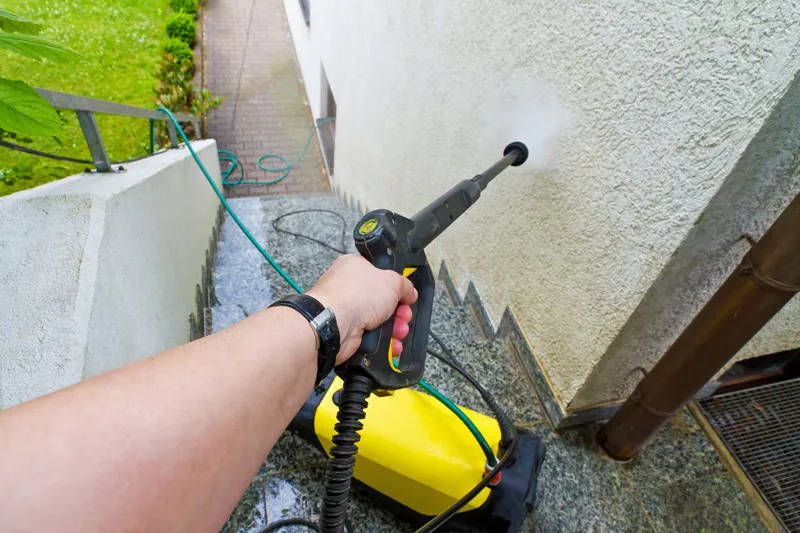
With your mold removal solution ready, it's time to apply it to the affected areas. Wet the walls to start, ensuring you prevent the spread of mold spores when you start scrubbing. Apply the solution generously, ensuring it soaks into the mold. Let it sit for effective mold removal. If you're considering a full exterior painting project after mold treatment, Perfect Painters in Ballarat can help you achieve the best results.
· Wet the Walls: Start by wetting the mold-infested areas with a hose. This prevents the spread of mold spores when you start scrubbing.
· Apply the Solution: Using a spray bottle or a sponge, apply the bleach solution to the mold-affected areas. Be generous with the solution, ensuring it soaks into the mold.
· Let It Sit: Allow the bleach solution to sit on the mold for at least 15 minutes. This dwell time is crucial for effective mold removal.
Step 4: Scrubbing and Removal
Banishing Mold with Scrubbing
After the dwell time, it's time to get scrubbing:
· Use a Scrubbing Brush or Pad: Armed with a stiff-bristle brush or scouring pad, gently but firmly scrub the mold-infested spots. Work in a circular motion, applying consistent pressure.
· For Stubborn Mold: If some mold proves resistant, spray more of the bleach solution and let it sit for a few additional minutes before scrubbing again.
Step 5: Rinsing
Thoroughly Rinsing the Treated Area
After successful scrubbing, it's crucial to rinse the treated area thoroughly:
· Pressure Washer: Use a pressure washer to rinse off the cleaning solution and any remaining mold. Start from the top and work your way down, ensuring complete coverage.
· Clean Water: Rinse the area with clean water from a hose to remove any residual bleach or mold.
By this point, you've successfully eradicated the mold from your exterior walls. However, there are some additional considerations to keep in mind.
Commercial Solutions
Exploring Commercial Mold Removal Products
While our homemade solution can be highly effective, you may opt for commercial mold removal products. These products are readily available and come with some benefits:
· Convenience: Commercial products are pre-formulated and ready to use, saving you the hassle of mixing your solution.
· Specialized Formulations: Some products are designed specifically for mold removal, offering added effectiveness.
· Safety Instructions: Commercial products often come with clear safety instructions, making them user-friendly.
Before purchasing a commercial product, ensure it's suitable for your specific mold problem and follow the manufacturer's instructions carefully.
Preventing Future Mold
| Preventive Measures | |
|---|---|
| Preventive Action | Benefits |
| Improve Drainage | Prevents water pooling |
| Trim Foliage | Reduces shade and increases sunlight |
| Use Mold-Resistant Paint | Deters future mold growth |
Tips to Keep Mold at Bay
Now that your exterior walls are mold-free, you'll want to take steps to prevent its return:
· Improve Drainage: Enhance drainage around your home to prevent water from pooling against the walls. This may involve repairing gutters, downspouts, or grading the ground away from the house.
· Trim Foliage: Trim back trees and foliage near your exterior walls to reduce shade and allow more sunlight to reach the surfaces.
· Mold-Resistant Paint: Consider using mold-resistant paint or coatings as an added layer of protection against future mold growth.
· Regular Maintenance: Periodically inspect your exterior walls for signs of mold or damage, and address any issues promptly.
Can You Paint Over Mold?
Addressing a Common Misconception
A common misconception is that you can simply paint over mold-infested surfaces. However, this is not advisable for several reasons:
· Mold Resistance: Some paints are formulated with mold-resistant properties, but even they are not a foolproof solution. While they can inhibit mold growth to some extent, they won't completely prevent it if the underlying moisture issue isn't addressed.
· Not a Cure: Painting over mold is not a remedy; it's more of a cosmetic cover-up. It doesn't eradicate the mold or prevent it from returning. In fact, mold can continue to thrive beneath the paint, causing further damage.
· Health Risks: Apart from property damage, painting over mold can pose health risks. Mold spores can still become airborne, leading to respiratory issues and allergies, even if they are hidden beneath layers of paint.
· Hidden Problems: Painting over mold can hide the extent of the damage, making it challenging for professionals to assess the true condition of the affected area. This can lead to more extensive and costly repairs later on.
Instead of covering up the issue, it's essential to follow the comprehensive mold removal process we've outlined to ensure a lasting and visually pleasing paint job.
Additional Expert Advice
Insights from Mold Removal and Painting Professionals
To provide you with even more insights, let's hear from experts and professionals in the field of mold removal and painting:
John Loveric, Mold Remediation Expert: "Effective mold removal involves not just cleaning the visible mold but also addressing the root cause. Ensure your exterior walls have proper drainage and ventilation to prevent mold from returning."
Emily Davis, Professional Painter: "Painting over mold is a band-aid solution. It's crucial to invest time in proper mold removal to ensure your paint job lasts and your home remains safe."
Additional Resources and References
To provide you with the most accurate and well-informed guidance, I've drawn upon a range of expert resources. Explore these references to further enhance your knowledge on treating mold on exterior walls before painting.
https://www.dulux.com.au/how-to/general/paint-problem-solver/treat-and-prevent-mould/
https://gocodes.com/mold-remediation-tools-equipment/
https://www.duluxdecoratorcentre.co.uk/blog/painting-over-mould-and-damp#:~:text=Unfortunately%2C
FAQs
Answering Common Questions
How can I permanently remove mold from exterior walls?
To permanently remove mold, follow the steps outlined in this guide, ensuring you address the root causes of mold growth and maintain a mold-resistant environment.
What should I apply on my walls before painting to prevent mold?
Consider using a mold-resistant primer or paint as a preventive measure before painting. These products can provide an added layer of protection against mold growth.
Is mold on exterior walls a health hazard?
Yes, mold on exterior walls can be a health hazard. Mold spores can become airborne, leading to respiratory issues and allergies. It's essential to address mold promptly and safely.
Can mold affect the longevity of exterior paint?
Absolutely. Mold can compromise the adhesion of paint to the surface, leading to premature peeling and deterioration of the paint job. Proper mold removal is essential for the longevity of your exterior paint.
Are there eco-friendly alternatives to bleach for mold removal?
Yes, there are eco-friendly mold removal alternatives, such as hydrogen peroxide or vinegar solutions. These options are less harsh on the environment but may require more effort and time for effective mold removal.
In conclusion, treating mold on exterior walls before painting is a critical step to ensure the success and longevity of your home improvement project. By understanding the causes of mold, taking safety precautions, using the right tools and materials, and following a thorough mold removal process, you can create a mold-free canvas for your next exterior paint job. Remember, a little extra effort now can lead to a more beautiful, durable, and healthier home in the long run. Happy painting!
GET IN TOUCH
Need more information? Speak to one of our experts and get personalised advice on your project to bring your vision to life. Contact us today to schedule your consultation or request a free consultation.
Contact Us

Unveiling artistic wonders, "Innovative Painting Techniques for Concrete Surfaces" explores creative methods like stenciling, acid staining, and glow-in-the-dark paint. Discover how these techniques transform dull concrete into vibrant canvases, making art accessible and exciting for everyone.Diverse Techniques, Endless Possibilities: Explore decorative stenciling, acid staining, glow-in-the-dark paint, and metallic epoxy coatings for a varied and dynamic range of artistic expression. · Practical Applications Beyond Aesthetics: Innovative painting techniques aren't just about looks. They enhance safety, functionality, and durability in various settings. · Maintenance Matters: Preserve the beauty of painted concrete with regular cleaning, proper sealants, and prompt repairs, ensuring longevity and vibrancy. · DIY vs. Professional Services: Consider factors like budget, time commitment, and complexity when deciding between a DIY project and hiring professionals for concrete painting endeavors. · Concrete as a Canvas: Celebrate the transformation of concrete into a legitimate medium for art. Discover how visionary artists and designers are reshaping public spaces with concrete masterpieces. Introduction The world of artistic expression has found a new canvas – concrete surfaces. In recent times, the popularity of innovative painting techniques for concrete has soared, transforming once mundane structures into captivating works of art. As someone deeply immersed in the world of creative exploration, I am thrilled to take you on a journey through the transformative power of painting on concrete. For further inspiration and professional insights, explore the offerings of https://townsvilleconcretingcompany.com.au/ .

Discover the wonders of eco-friendly paints and concrete for home projects. They improve air quality, save money in the long run, offer vibrant colors, empower DIY adventures, and bring real-world benefits like reduced allergies and energy efficiency. · Improved Indoor Air Quality: Opting for eco-friendly paints reduces volatile organic compounds (VOCs), promoting healthier indoor air and minimizing respiratory issues. · Cost-Effective Sustainability: Despite initial costs, eco-friendly paints and concrete offer long-term savings through durability and energy-efficient properties. · Diverse Aesthetic Choices: Contrary to misconceptions, eco-friendly paints boast vibrant, long-lasting colors, ensuring aesthetic satisfaction without compromising sustainability. · DIY Opportunities: Embrace sustainable home improvement with DIY projects using eco-friendly paints and concrete, contributing to both personal satisfaction and environmental well-being. · Real-World Impact: Explore success stories where families experienced tangible benefits, from reduced allergies to lower energy bills, showcasing the real-world positive impact of eco-friendly choices.

To estimate the cost of painting a house's outside, measure the area, pick the right paint, factor in labor, and account for any extra work needed. Consider hiring pros for quality. · Accurate cost estimation for exterior house painting is crucial for effective budgeting and project planning. · Factors such as surface area, type, prep work, paint quality, labor, and additional features significantly impact the overall cost . · Cost ranges vary widely, with small to medium-sized homes averaging $2,000 to $5,000. · Utilize online calculators, painting software, and industry guides for precise cost estimation. · While DIY painting can save money , professional painters offer expertise , efficiency, and guaranteed quality. When it comes to transforming the look of your home, few things have the impact of a fresh coat of paint. Whether you're planning to give your house a facelift or you're getting it ready to sell, estimating the cost of exterior house painting accurately is of utmost importance. It helps you budget effectively, avoid unexpected expenses, and ensures that your project proceeds smoothly. In this guide, we will dive deep into the world of exterior house painting cost estimation. We will explore the various factors that can influence the cost, provide you with average cost ranges, and take you through a step-by-step process to estimate the expenses involved. Additionally, we will share valuable resources, tips for cost-saving, and insights into the advantages of hiring professional painters. So, let's get started on your journey to understanding the art of estimating exterior house painting costs.
GET IN TOUCH
Need more information? Speak to one of our experts and get personalised advice on your project to bring your vision to life. Whether you're considering a fresh coat of paint or specialized concrete installations, our team is here to help. For expert concrete services, check out our trusted partners at Concrete Contractors. Contact us today to schedule your consultation or request a free quote
Contact Us
Painters Ballarat, VIC
Professional Local House Painters Near Me
Perfect Painters in Ballarat are professional and local Ballarat painters. We've been operating for over 10 years with the best painters in the area.
Our team is only made up of the most highly qualified and skilled painters to ensure you always get the results you're looking for.
Need a new coat of paint? Reach us at (03) 4828 1320. Our Ballarat Painters are ready for you!
Quick & Reliable
We can be contacted anytime via email or telephone
Location
131 Scott Parade, Ballarat East VIC 3350
info@perfectpaintersinballarat.com.au
Call
Ballarat's #1 professional House painting Service providers since 2010.
This is a referral website, please visit our Privacy Policy for more information. Find us online.
Navigation
Services
Working hours
- Mon - Fri
- -
- Sat - Sun
- Closed
Give us a call and if we cannot get to you straight away, one of our specialist will call you back shortly.
New Paragraph